Flashback Friday
Disclaimer: This is a semi-related continuation of yesterday's post. But not really. You can still keep reading even if you have no idea what I'm talking about.
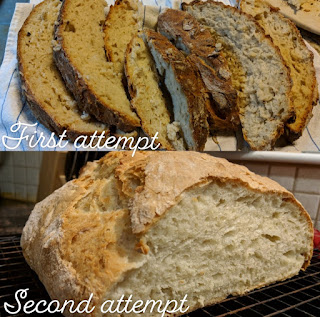
I mentioned in the post yesterday that it was my second attempt at the crusty Italian bread, a no-knead loaf that should have been easy as pie. Anything no-knead should be low effort, right? (tip: if you follow directions, it totally is) When I made it for my family I knew it wasn't perfect, but I didn't realize just how imperfect it was until I looked at my first and second attempt at this recipe side by side.
So you can see a few differences from these pictures, I'm sure. The rise, the coloring, the texture, it's all so different between the first and second loaf. I couldn't believe it until I put them up side by side. I thought the first loaf tasted fine, but the second loaf blew me away! Here are some of the things I learned from taking a second stab at this recipe:
I mentioned in the post yesterday that it was my second attempt at the crusty Italian bread, a no-knead loaf that should have been easy as pie. Anything no-knead should be low effort, right? (tip: if you follow directions, it totally is) When I made it for my family I knew it wasn't perfect, but I didn't realize just how imperfect it was until I looked at my first and second attempt at this recipe side by side.
 |
| Whoah! Talk about an improvement. That first loaf looks 1. overdone 2. really rough. literally. and 3. just....ugly |
 |
| Slice it up, and there's even MORE of a difference! Check out the difference in rise! Texture! Color! Everything! |
So you can see a few differences from these pictures, I'm sure. The rise, the coloring, the texture, it's all so different between the first and second loaf. I couldn't believe it until I put them up side by side. I thought the first loaf tasted fine, but the second loaf blew me away! Here are some of the things I learned from taking a second stab at this recipe:
- Under no circumstances should you ever put this recipe in a proofing basket. Someone on the street offers you a million dollars to put this dough in a proofing basket? .....well, maybe you do it. But not for anything less than 7 figures! It is a nightmare to clean, does nothing for the rise of the dough, and causes way more trouble than it's worth.
- The proofing basket is the root of all of my pitfalls on the first attempt, honestly. After you preheat the cast iron skillet/pizza stone/whatever you are cooking your bread on, you need to transfer the dough to it quickly and then rush it back into the oven to get the crust cooked properly on the bottom. The skillet has to retain the heat from the oven while you transfer everything. I had such a hard time removing the dough from the proofing basket that I had about 5 minutes go by between taking the skillet out of the oven and finally putting the dough on it for my first attempt, and it had cooled too much, so the bottom of my loaf took F O R E V E R to cook.
- And speaking of that darn proofing basket, I guess painstakingly pulling the dough out of it caused a lot of the air pockets to escape. I was able to transfer the dough quickly and without much handling for my second attempt, and the rise is tremendously higher with much larger air pockets, with greater variety in the sizes of air pockets too.
The texture of this bread (attempt #2, the pretty one) turned out amazing! It's everything a loaf of Italian bread should be. Its got a chewy, thick crust, and the interior of the loaf is perfectly spongy and can hold up to some serious butter. I can't wait to make some grilled cheese sandwiches with this bread!


Comments
Post a Comment